Tutorial iOS
Tutorial
With this tutorial we describe in 13 easy steps almost all functions of our app:
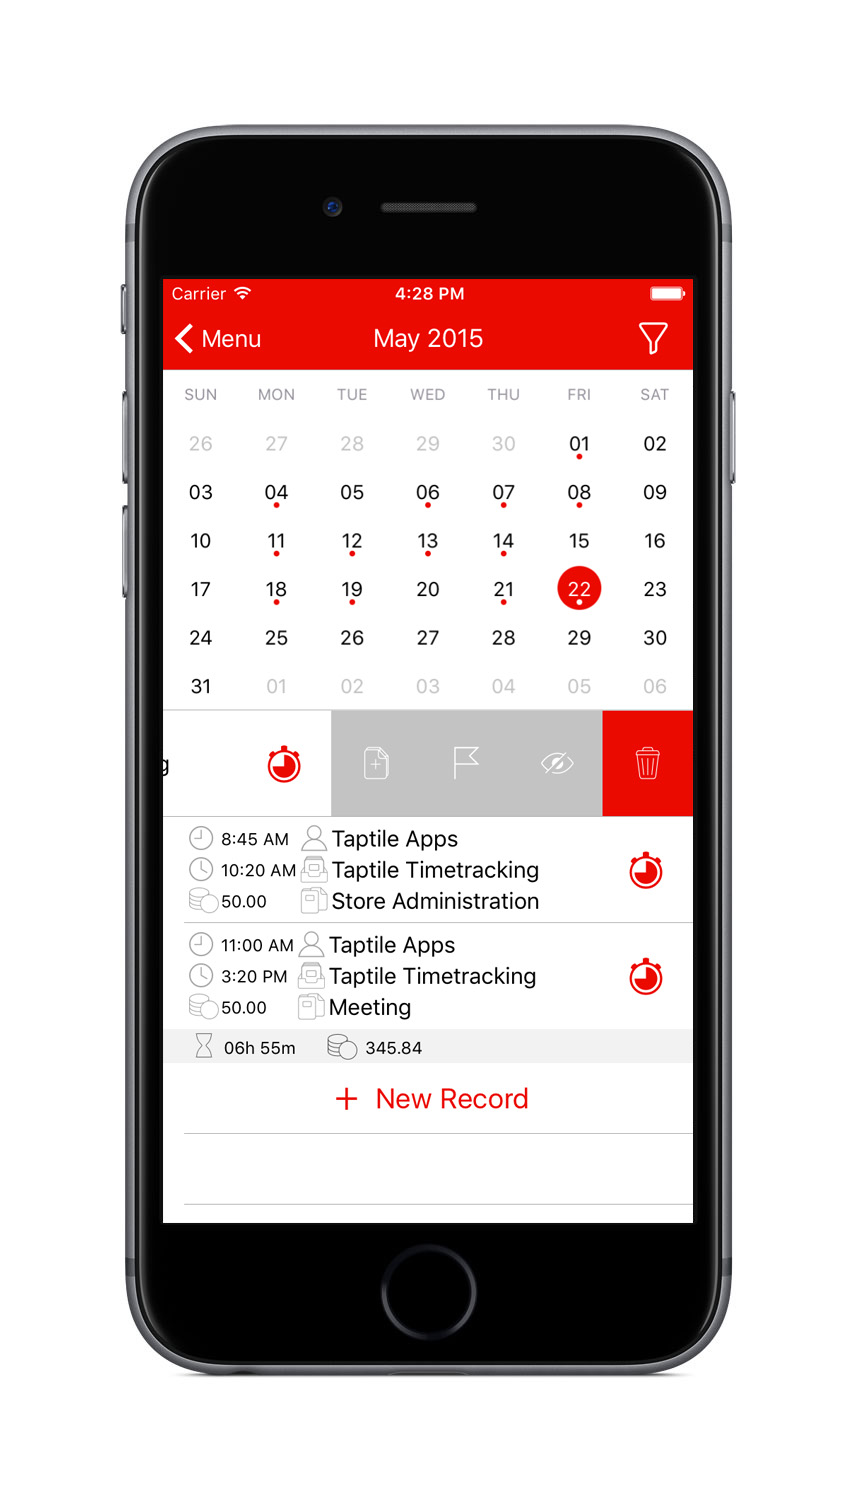
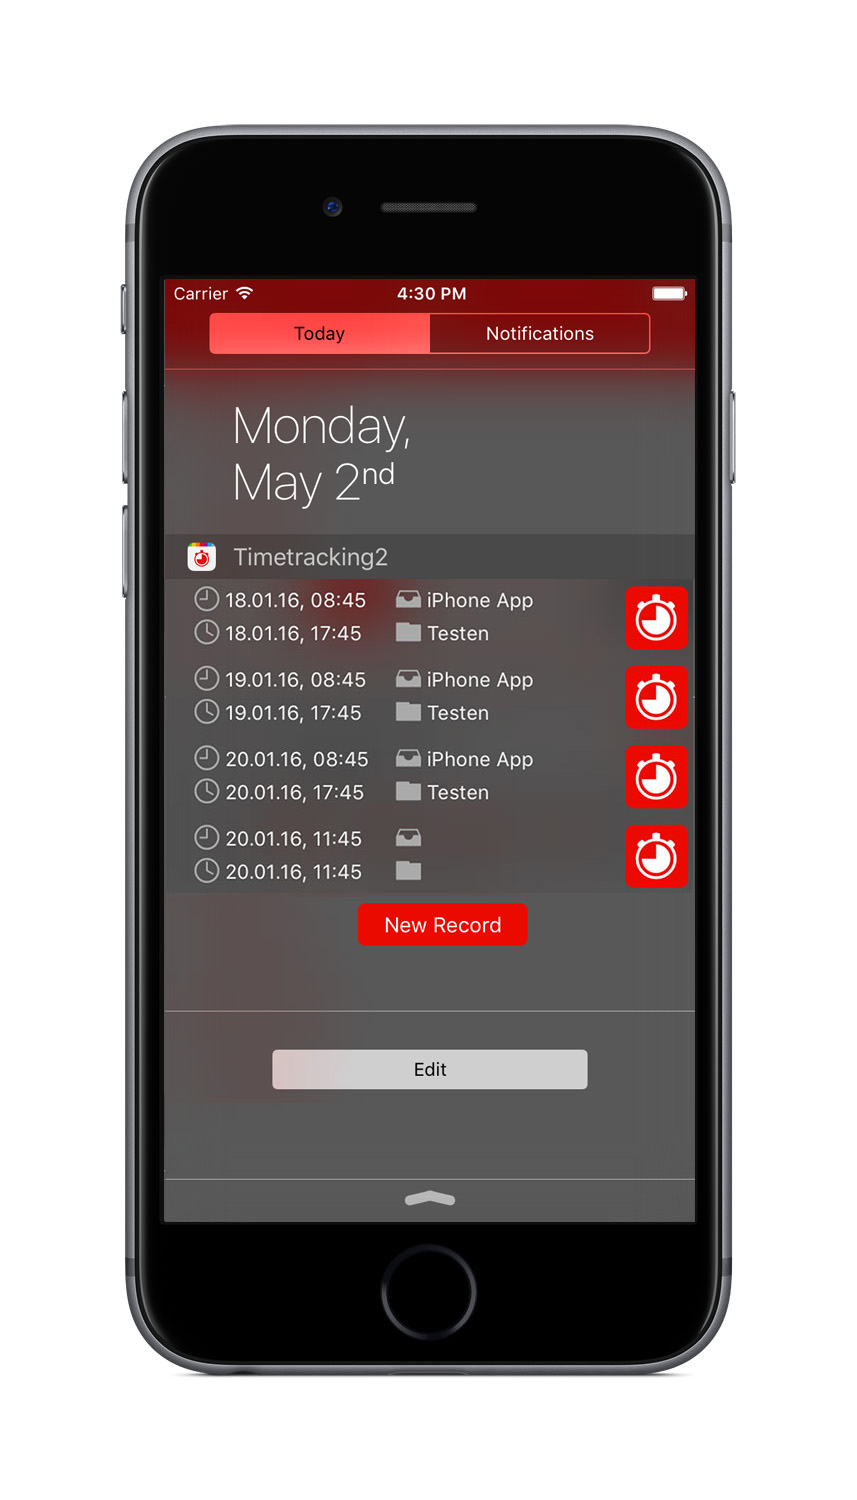
1. App Start Calendar
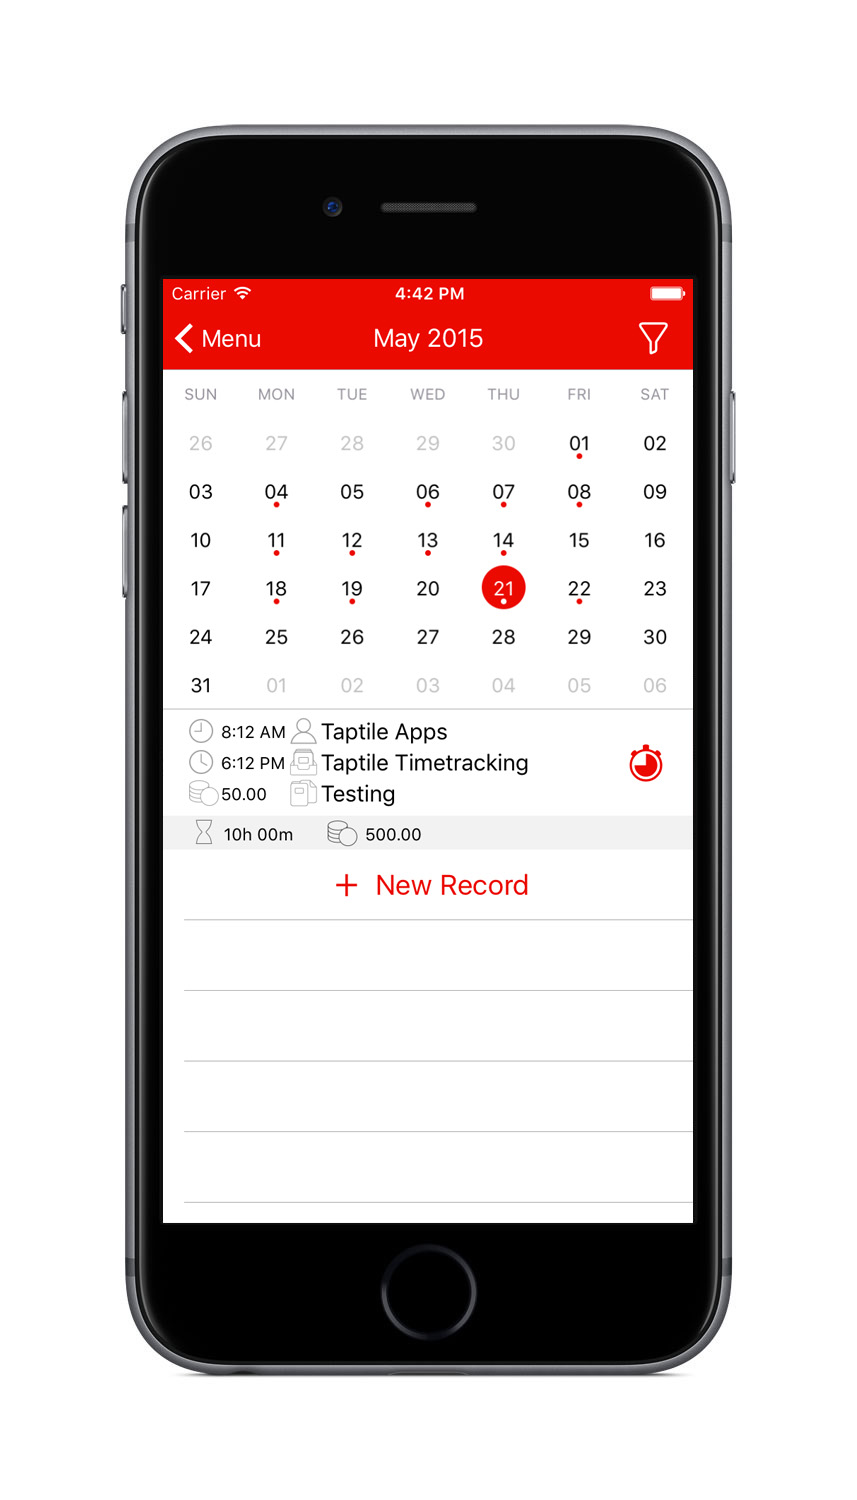
The app starts usually in the calendar. (Otherwise, you can open it via the menu.)
In the calendar you can quickly see what you have been working on the various days.
In the footer of the Records list below the calendar you can see a Total number of hours and revenue for that day (when you record Tasks with an hourly rate).
Create now a new Record at the currently selected day with the line "+ New Record".
2. Create your first Record

A new Record has been created with the current start time.
You can directly edit this Record and assign it to a Job or Task as it has been done in the screenshot.
You can also give this unique Record a Rate/h, an Addition or a Deduction, but that does not make much sense, more on that later.
There is space for a Note at the bottom of the screen. It belongs only to this Record.
Assign this new Record now to a Job. In the opening Jobs-List, just create a new Job.
3. Create a Job
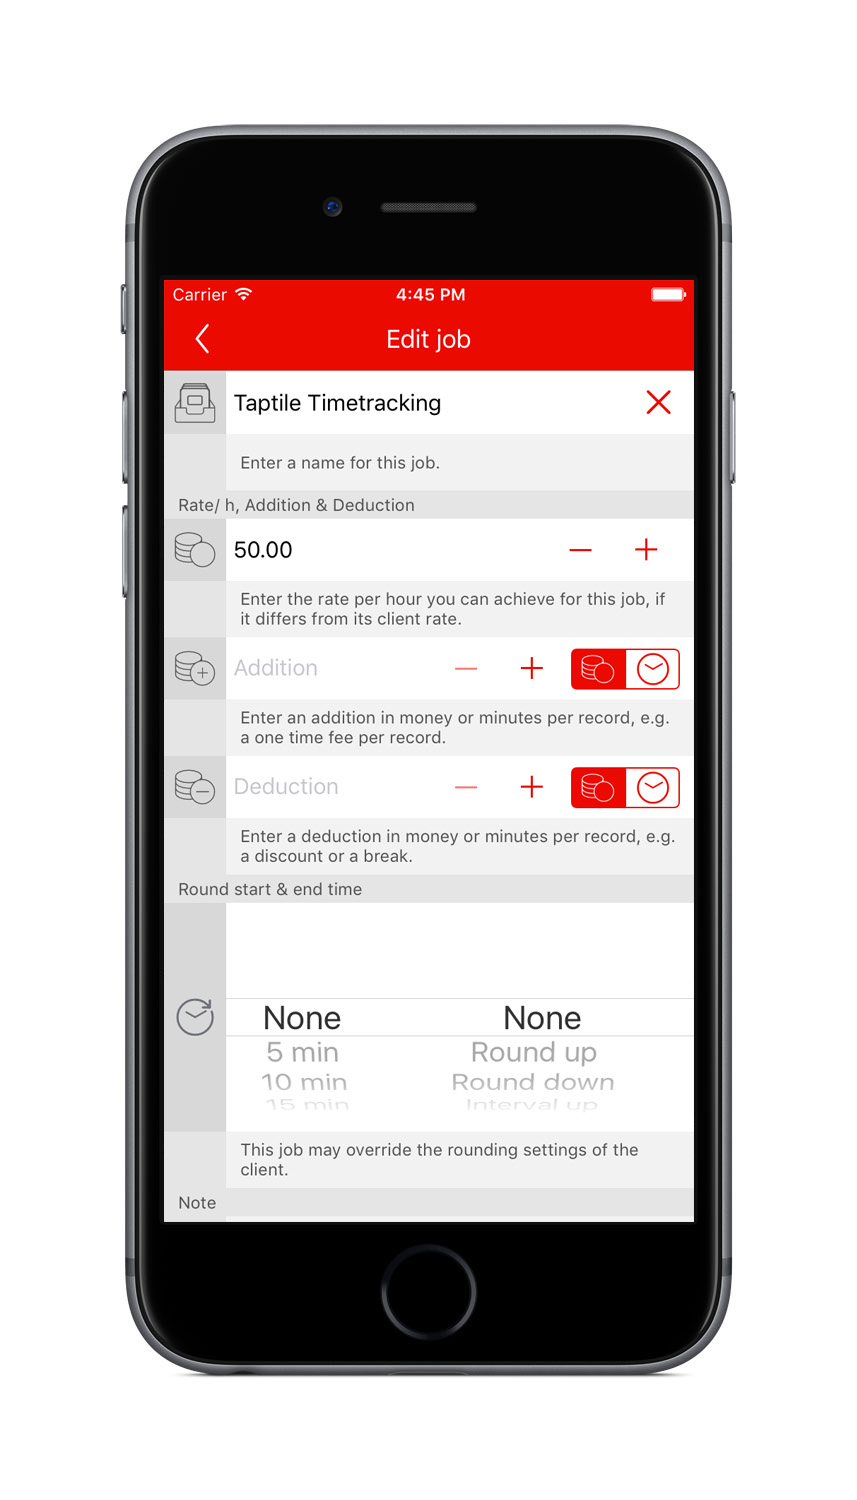
A new Job has been created and you can edit it directly.
Please enter a Job name.
If you can bill times per hour, enter the Rate/h here. It is applied to all Tasks and Records for this Job by default.
In Addition you can define a money or minute amount to be included in EVERY Record for this Job. With this function you can, for example, realize a daily rate, but more on that later.
In Deduction you can define a money or minute amount to be deducted on EVERY Record for this Job. With this function you can, for example, realize an automatic break deduction.
If you want to round the start and end times automatically, you can set this here. This setting is applied to all Tasks and Records for this Job by default.
There is space for a Note at the bottom of the screen. This belongs only to this Job.
Assign this Job now to a Client. In the opening Clients-List, just create a new Client.
4. Create a Client
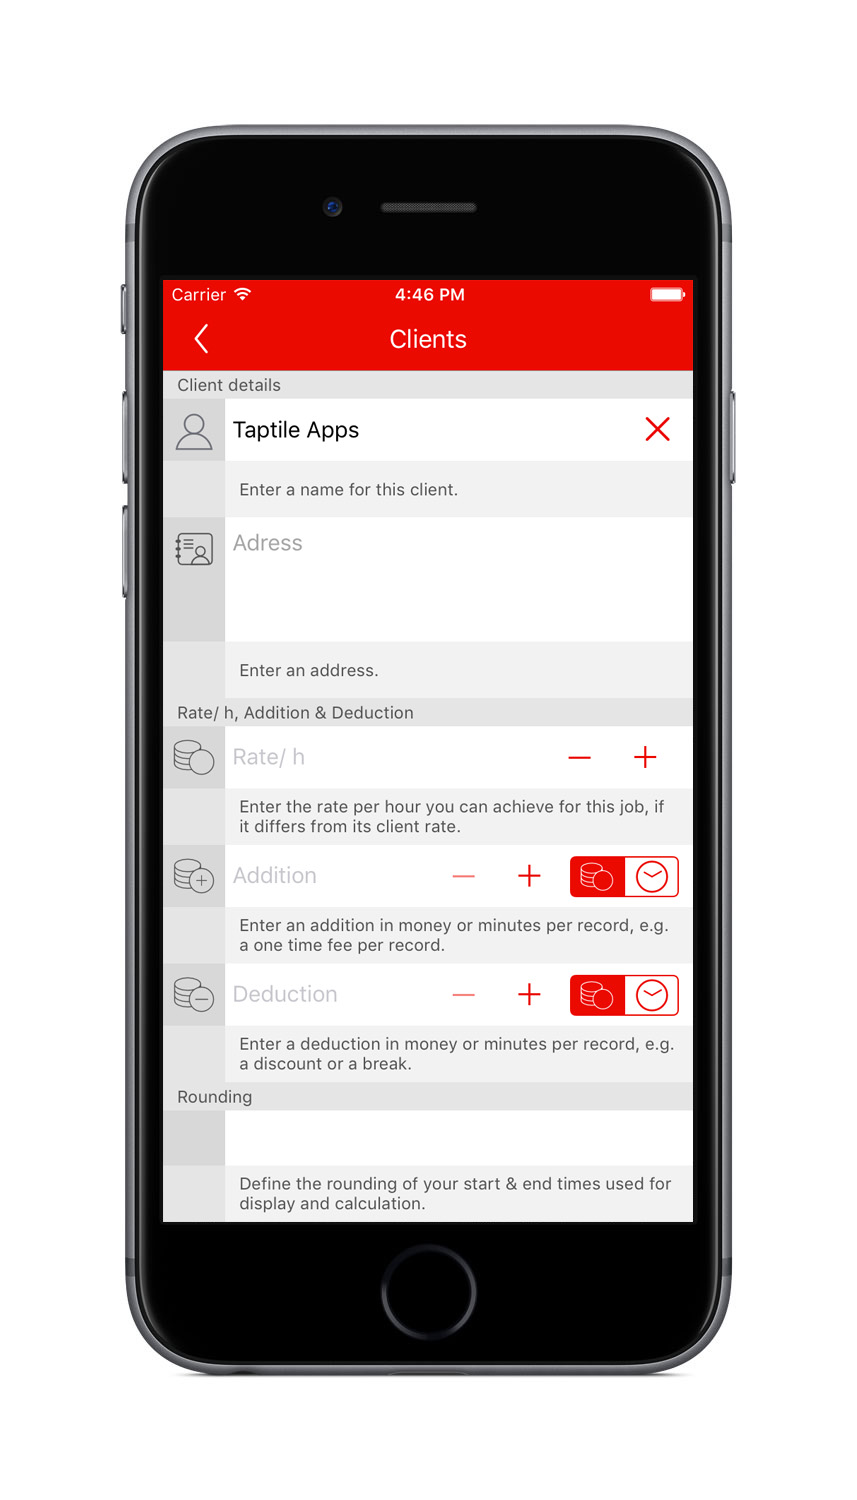
A new Client has been created and you can edit it directly.
Please enter a Client name.
At the Client details you can set Rate/h, Addition, Deduction and rRunding that will be used in all Jobs, Tasks and Records by default.
But in our experience, it usually makes more sense to define this in the Job.
Are you finished creating the Client, go back one screen. Tap the Client in the Clients-List and assign it with that to the Job.
Go back one screen from the Job details. Tap it in the Jobs-List and assign it with that to your Record.
5. Create a Task
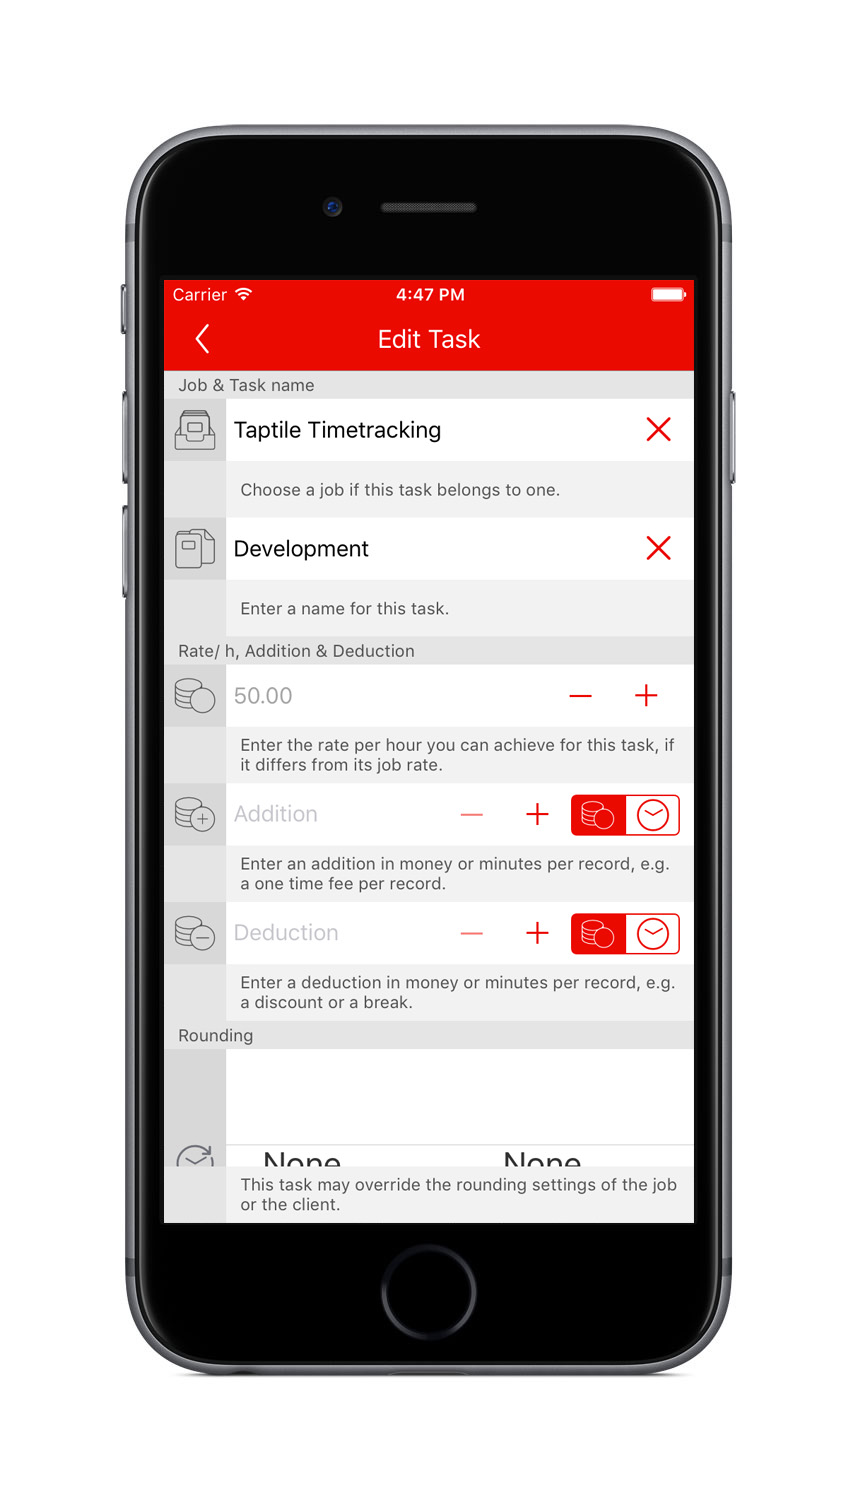
Create a new Task, as you have already done with Job and Client.
This Task has been automatically assigned to your Job and the Rate/h, Addition, Deduction and Rounding settings were taken from the Job, if you have entered them.
The Tasks Addition can be used to realize a Daily rate , if you need that.
You can override the Rate/h, Addition, Deduction and Rounding from the Job (or Client) in a Task.
Are you finished creating the Task, go back one screen. Tap the Task in the Tasks-List and assign it with that to your Record.
6. First Record created
Congratulations, you now have created your first Record including the complete job configuration.
Further Records can be created much faster by you in the future using the red stopwatch button on this Records table row.
This stopwatch button stops and starts your Records fastest. This is also available in the Today widget, but more on that later.
Sometimes you will have to create a few more Tasks for your Job, so you can record your Times correctly.
7. Menu
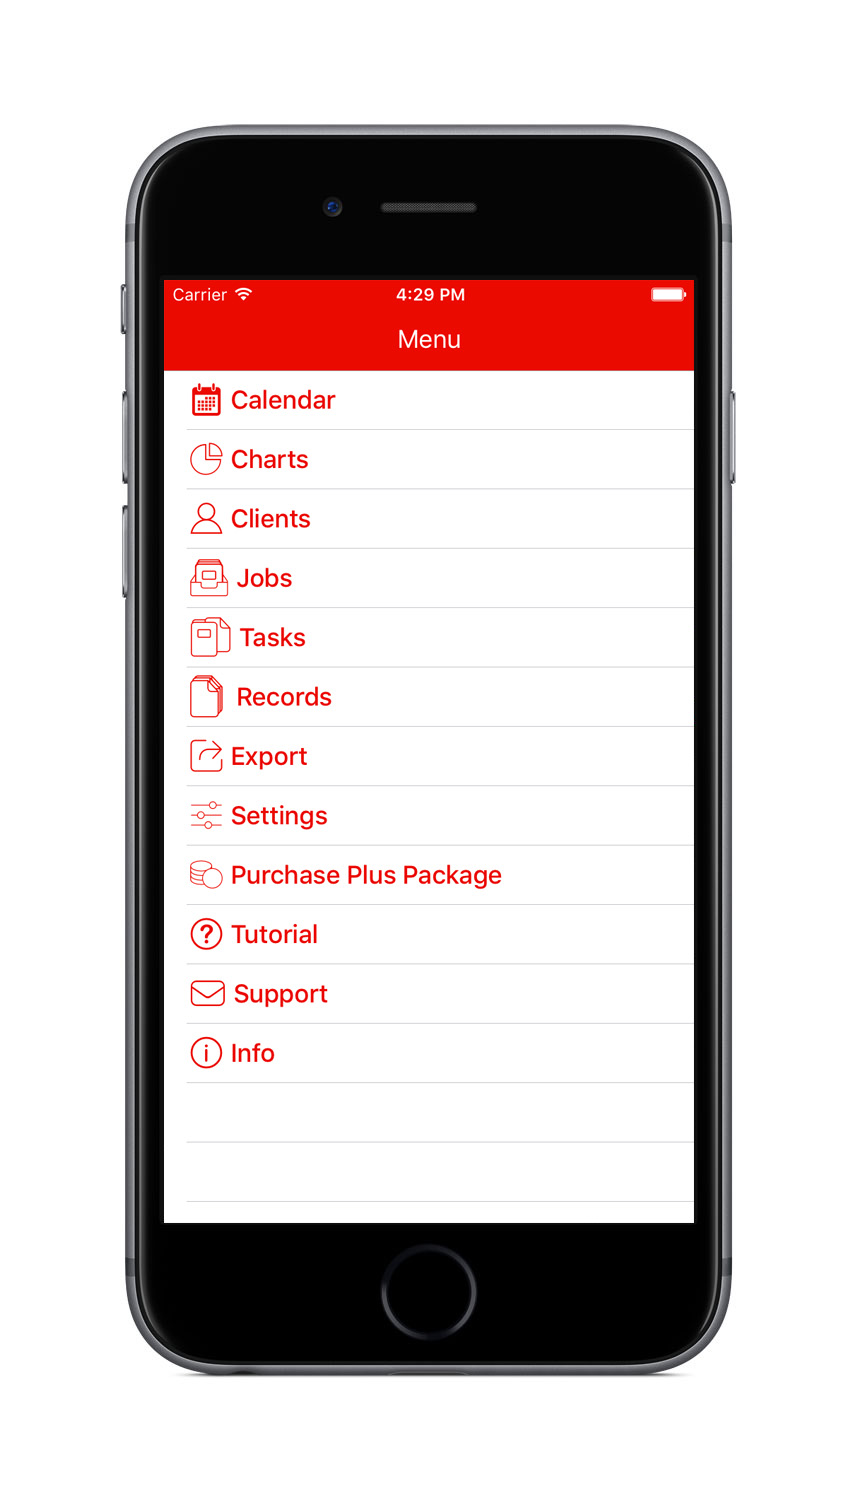
With a Tab on the menu label in the upper left you open the menu.
Through the menu you reach all other areas in our app and can switch to the Charts, the Lists of your Clients, Jobs, Tasks and Records. Switch to the Exports, Settings, the Tutorial and the Information page.
If you want to contact us because you have a problem or question, you can do this with the Support button in the menu: Sending an email directly to us.
8. Work with and Delete Records
Creating further Records is much easier than the very first. We had already mentioned that.
Would you like to Duplicate a Record, you can swipe on the table row and use the document-plus button.
That copies this record to today. Thus, it is therefore quite simply possible, to create the same working hours for every day.
Using the Flag button, you can mark this record (or in the other lists the Client, Job or Task) for any purpose.
Using the Hide button, you can hide this record (or in the other lists the Client, Job or Task) and it will only be visible in Edit-mode of the Clients-, Jobs-, Tasks- and Records-List.
Do you wish to Delete the Record, you can do this with the Trash button here.
9. Configure Budgets
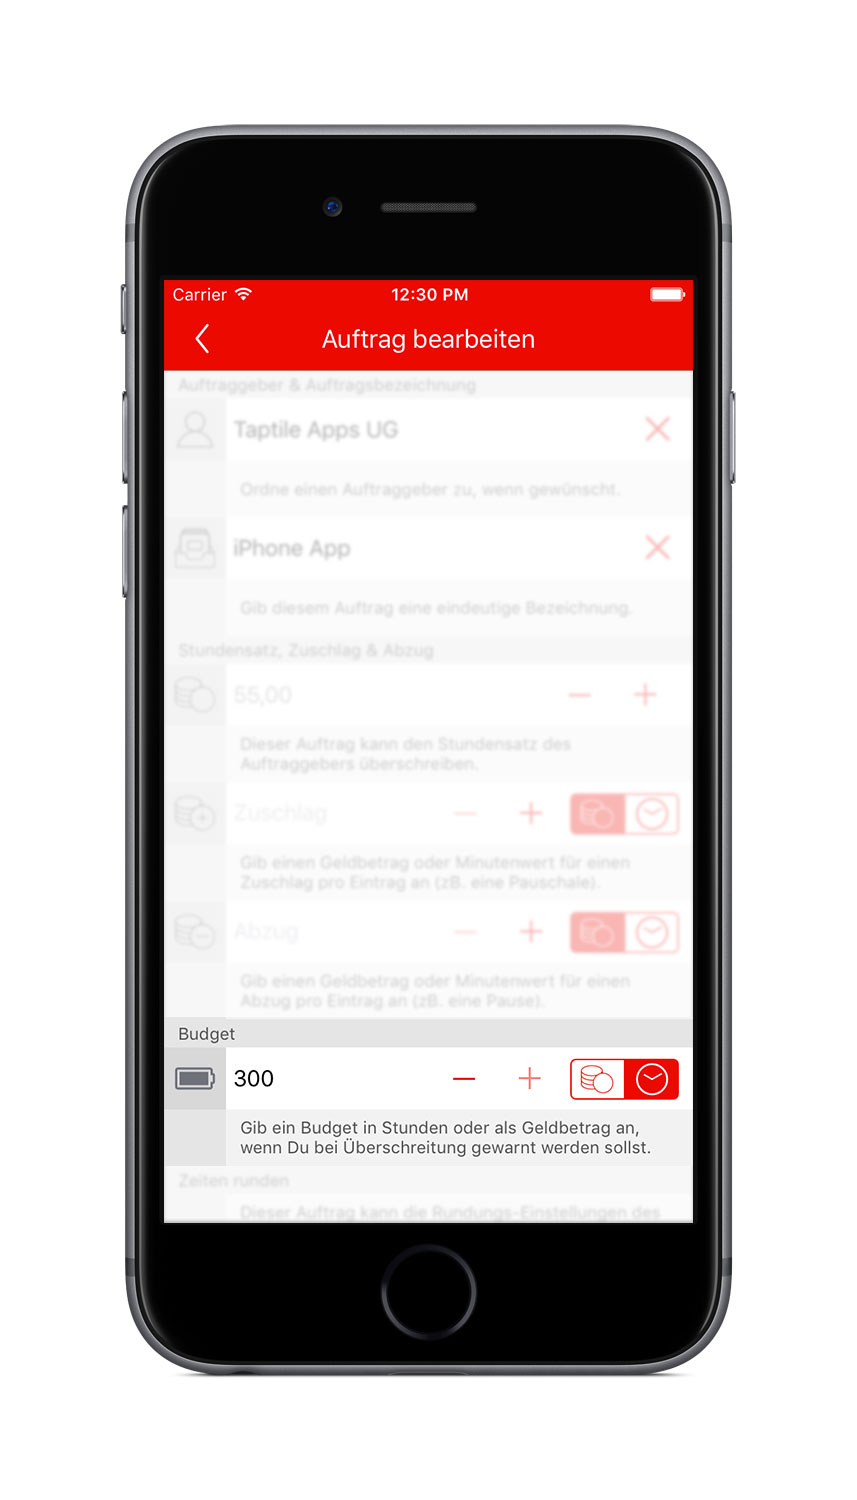
Budgets can be configured for Clients, Jobs and Tasks.
E.g. at the Job details a number of hours or sum of revenue can be configured, that should be used for the budget calculations.
Budgets for Clients, Jobs and Tasks are completely independent of each other and will be displayed with colored icons in all lists.
... watch budget usage
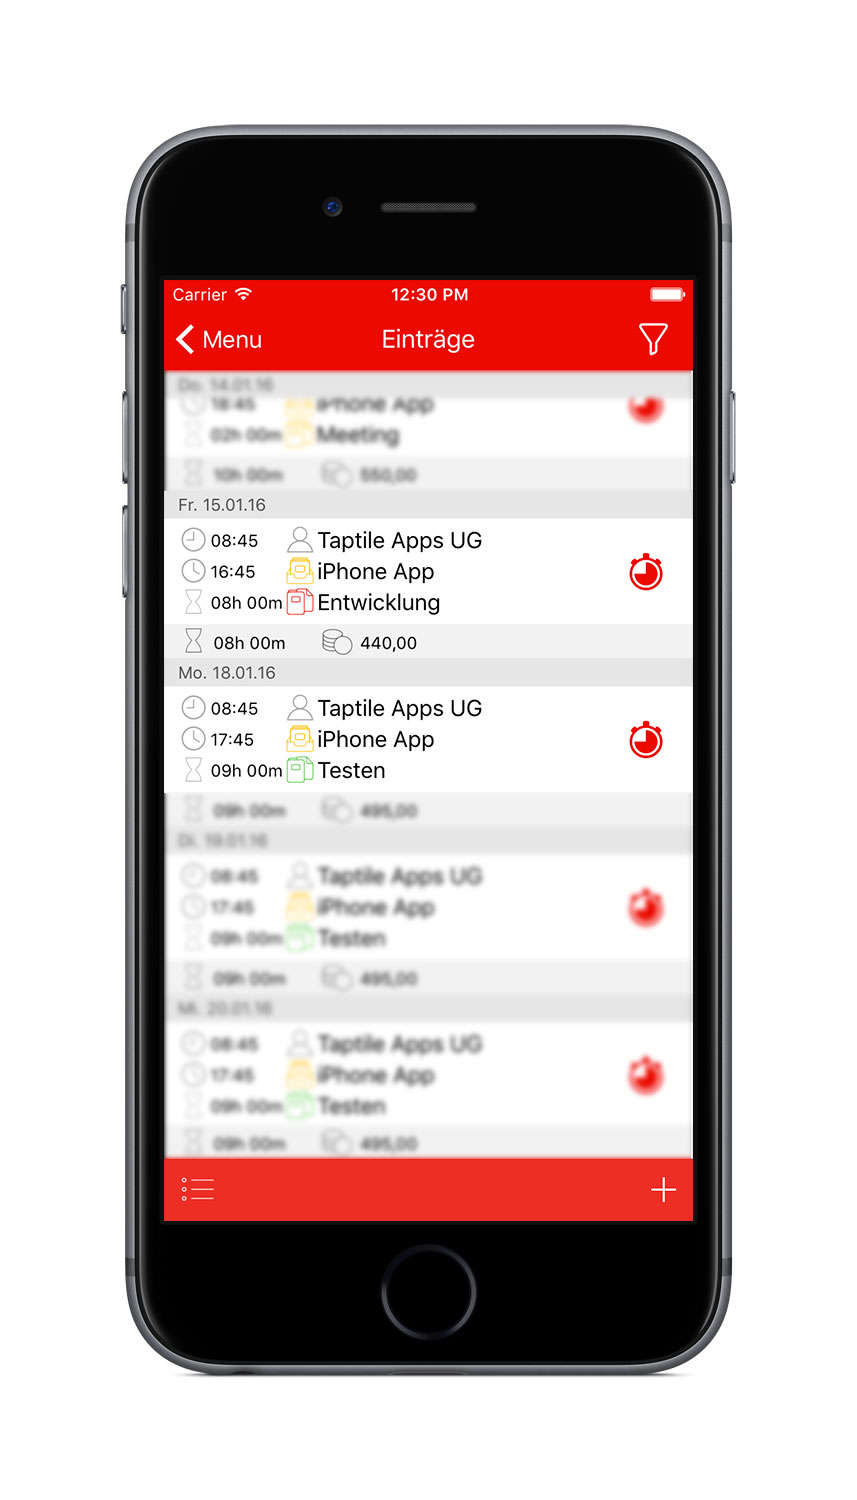
The current Budget usage can be seen in the Clients-, Jobs-, Tasks- and the Records-List.
The current state of the budget will be displayed with red, yellow and green icons, which signal the actual usage.
At the screen e.g. the budget for the Task 'Testen' is fine in green state. The budget for the Task 'Entwicklung' is nearly used up.
The budget for the Job 'iPhone App' is used, but enough is available.
There hasn't been configured any budget for the Client 'Taptile Apps UG'.
10. Today-Widget
You can create a Record even faster.
Use our Todayscreen Widget on your iOS device to display the items of the last days.
Again, you can use the red stopwatch or "New Record" button here to create new Records.
11. Charts
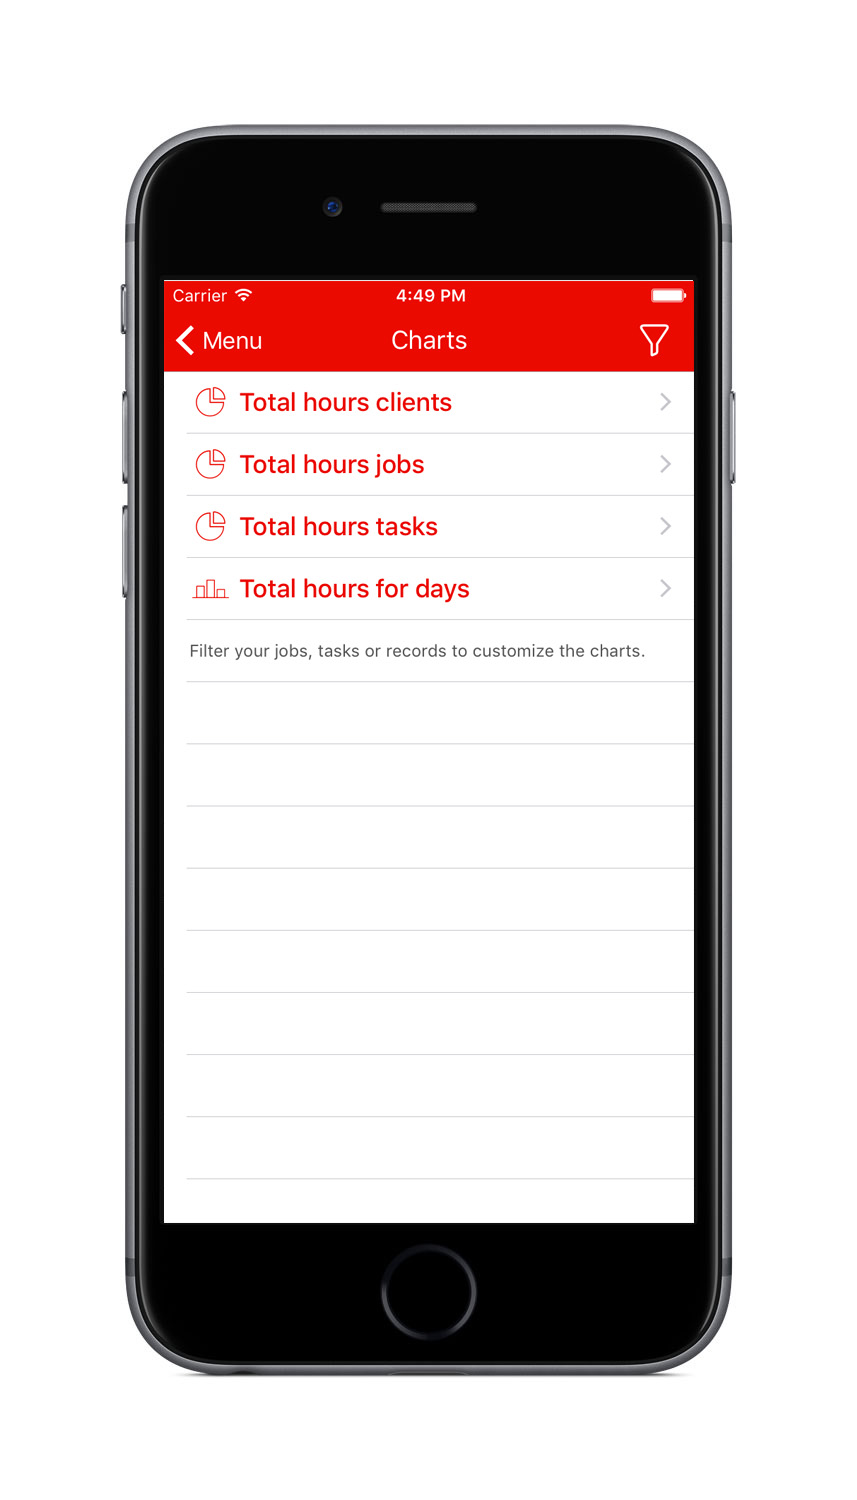
Would you like to see a graphic distribution of your working hours, you can call up the charts from the menu.
Here are available for selection the Distribution of your hours on the client, the jobs, tasks and days.
It is recommended to filter your data, before opening a chart, to maximize the performance of chart rendering. Especially the Tasks-Chart can take a long time to render, if you have much data.
12. Filter
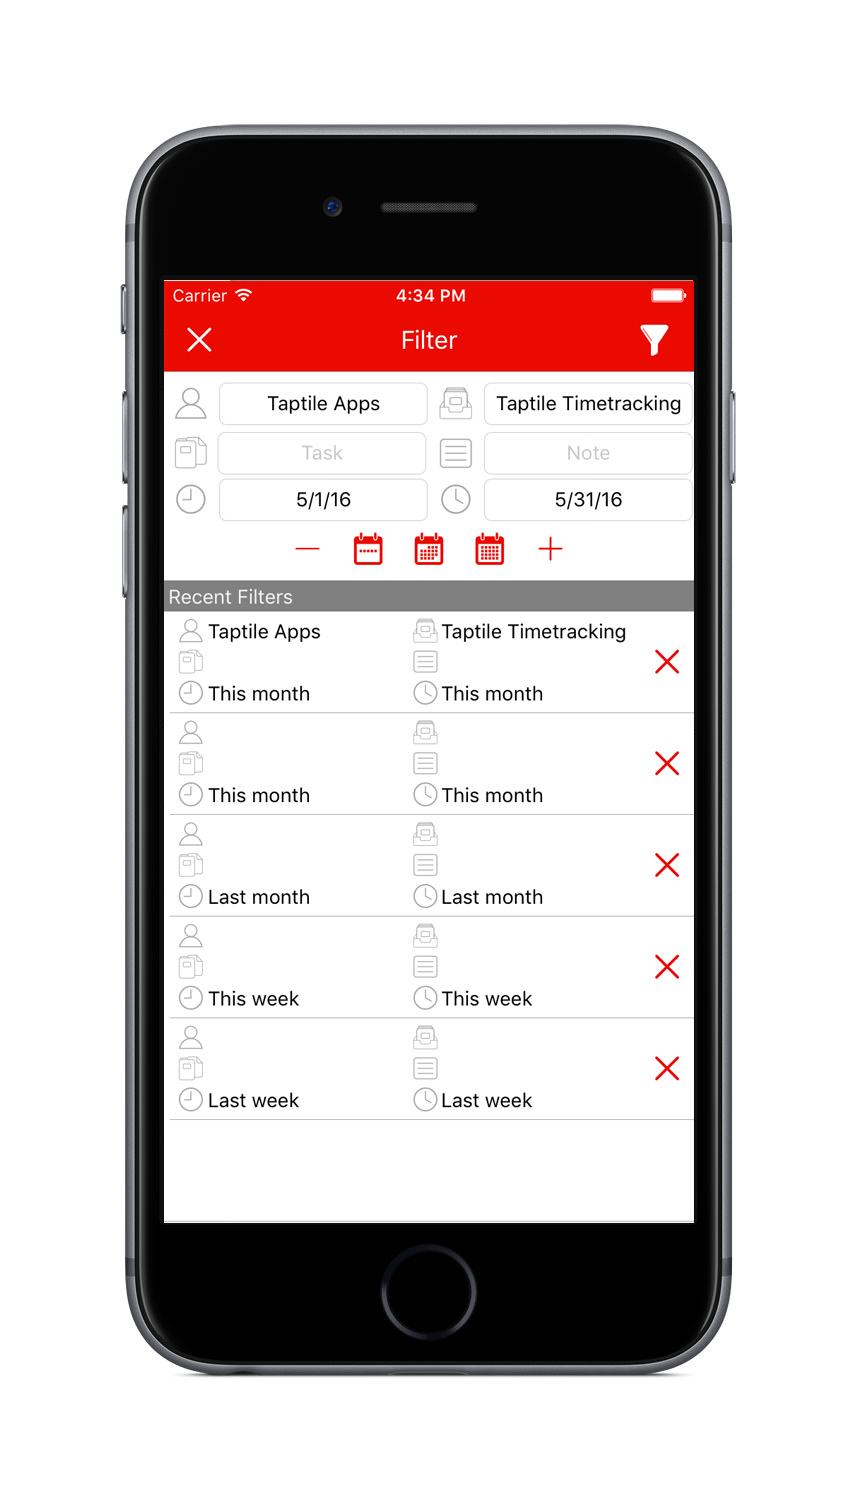
Almost everywhere in our app in the top right corner the Filter is available with the Filter icon.
With this you can Filter the data to be displayed and exported. The filtering is possible for Client, Job, Task and Notes, as well as any time periods.
For the time periods there are predefined buttons for week, month and year.
Each Filter is automatically stored in the list and is available for direct access later.
With the Filter Delete button at the upper left corner, you can disable the Filter and leave the screen.
13. Export and Database Backup

Do you wish to export your working hours, there are available the CSV and PDF export.
The CSV Export can be opened directly in Numbers on your iOS device, or be used for importing on your desktop computer.
Depending on the app, you sometimes need a comma or semicolon as separator.
The PDF export is ideal to attach it to your bill or to refer it to the project leader.
Revenues and notes can be hidden, if they should not appear in the PDF.
Exports can be send by Email, stored into your iCloud Drive or be opened directly on your device in other apps.
At the bottom of the Export screen there is the Database Backup, your complete dataset can be backuped with that. Into an e-mail or into your iCloud Drive.
This database backups can later be imported back into our apps again.
14. Settings
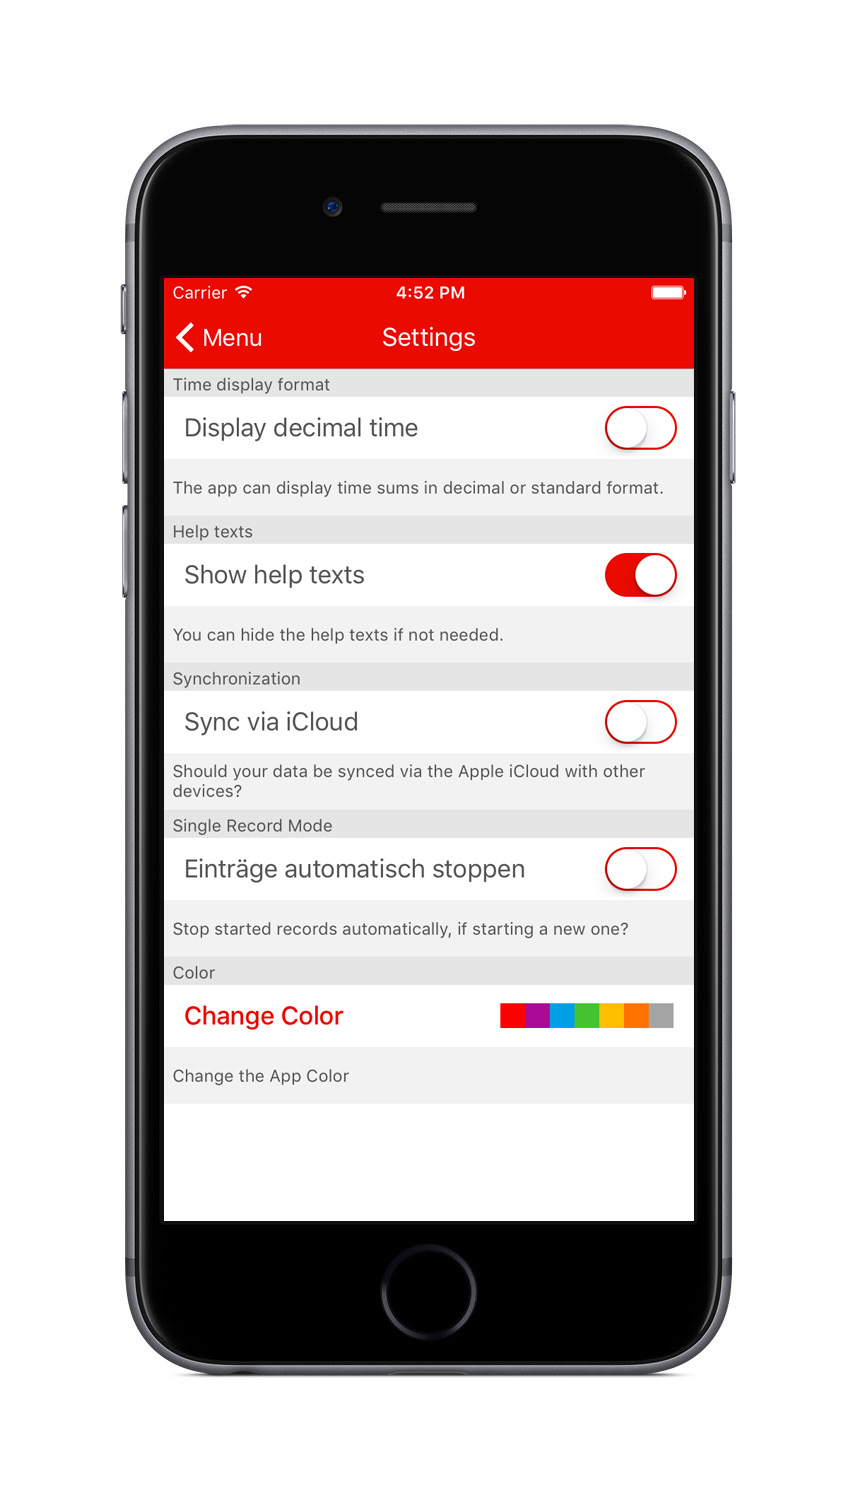
In Settings you can change the display of your working hours to decimal time.
If you no longer need the Help text, you can hide them here.
Do you want to synchronize your data between iPhone, iPad and Mac, you can activate this here.
Are there problems with the iCloud sync, please send us an email, because the configuration must be correct in several places in the system.
We love to help you with that per email!
If you ever only want to have one active record at a time, enable the "Single Record Mode". Started Records will be stopped automatically, when you create a new Record.
If you want to change the red color of the app, just click through the palette of available colors and choose your favorite.

